samedi 28 juillet 2012

TAST 30 : le point de perle

Le point du TAST de cette semaine a pour nom "oyster stitch" en anglais, c'est à dire, littéralement "point d'huître". Le nom français est un peu plus poétique, puisqu'il s'agit du point de perle. 
The point of this week is called "point de perle" in French, ie, literally "pearl stitch". The english name is oyster stitch.


Aujourd'hui, je me suis encore laissée aller à faire un petite boîte, cette fois c'est un petit mouton qui s'est installé sur le couvercle, le point de perle étant parfait pour broder sa toison. Les yeux et les petites fleurs dans l'herbe sont aussi réalisés avec ce point. Je sais, il a une drôle de tête, mais je crois que c'est dû en partie à la toile noire que j'ai utilisée pour que la toison blanche ressorte mieux. 
Today, I done a small box, this time it's a little lamb who settled on the top, the pearl stitch being perfect for its fleece. The eyes and the little flowers in the grass are also made ​​with this stitch. I know he has a strange face, but I think this is partly due to the black fabric I used to make the white fleece more visible.


Comme je n'avais pas de crayon blanc pour dessiner le contour du couvercle, je l'ai marqué rapidement à la craie, puis j'ai passé un fil blanc pour rendre le trait un peu plus "permanent". Une fois la broderie montée sur la boite, il a suffit de tirer le fil. 
Since I had no white crayon to draw the outline of the box, I quickly marked it with chalk, then I used a white thread to make the line a little more "permanent". Once the embroidery mounted on the box, I  just had to pull the thread.

 
Pauline a fait ses devoirs de vacances. Elle aime beaucoup le livre "The right-handed embroiderer's companion" d'Yvette Stanton, même s'il est en anglais. Les étapes sont très détaillées et il est vraiment clair. Elle s'en sert souvent pour apprendre les nouveaux points du TAST.
Pauline did his homework. She loves the Yvette Stanton book "The right-handed embroiderer's companion", even if it is in English. The steps are very detailed and it is really clear. She uses it often to learn new points of TAST.


vendredi 27 juillet 2012

Problème avec mes messages

Coucou,
Un petit mot en passant pour vous parler d'un problème d'intendance : j'ai des soucis pour répondre à vos messages. Jusqu'ici je répondais par ma boîte à mail, mais il semble que certaines réponses ne parvenaient pas à leur destinataire. Et aujourd'hui, j'ai reçu tout un paquet de "warning" me disant que mes derniers mails s'étaient perdus dans la nature.
Je sais qu'il est possible de répondre directement sur le blog à la suite des messages, mais je n'ai pas trouvé comment activer cette fonctionnalité. J'ai vu que certaines d'entre vous utilisaient Blogger et parvenaient à effectuer cette opération. Si elles pouvaient m'éclairer de leurs conseils, je leur en serais très reconnaissante.
Et désolée pour celles qui n'ont pas reçu de réponse à leur message. Ce n'ai pas de la mauvaise volonté ou de la négligence. Je suis juste (provisoirement ?) vaincu par la technique.

Hello,
Just a word to tell you about a technical problem: I have concerns to respond to your messages. So far I responded with my email box, but it seems that some responses found not their recipient. And today, I received a packet of "warning" telling me that my last emails got lost into the wild.
I know it is possible to respond directly on the blog in response to messages, but I have not found how to activate this feature. I saw that some of you are using Blogger and manage to do this. If they could enlighten me with their advice, I'd appreciate them.
And sorry for those who have received any reply to their message. I t is not negligence. I'm just (temporarily?) defeated by technology.

jeudi 26 juillet 2012

Finiiiiiii

J'ai enfin fini le premier groupe de cavaliers. Oui, bon d'accord, c'est juste un touuuut petit morceau de ma toile. Mais zut, on se motive comme on peut. Enfin bref, voilà ce que ça donne :
I finally finished the first group of knights. Yes, okay, it's just a small part of my tapissery.  Anyway, here is the result :


Au passage, je vous montre comment on peut venir à bout d'une zone un peu "tordue", comme ici l'épaule et la jambe du cheval. Pour la direction, en général, on prend le plus grand bord droit, ici, la lance. Mais honnêtement, je me sers surtout des photos de mon bouquin pour me repérer.
Incidentally, I show you how to get around an area a bit "twisted", as here the horse's leg and shoulder. The direction is usually chose as the greatest straight edge, here, the spear. But honestly, I use mostly pictures of my book to find my way.


En ensuite, bin on remplit autant qu'on le peut, et on s’arrête quand ça coince.
By then, we fill the area as much as we can, and we stop when we get stuck.


Et ensuite, on passe à la zone suivante, en utilisant les barrettes pour cacher les jonctions, comme je l'avais expliqué ici.
And then we move to the next area, using the strips to hide the junctions, as I explained here.


Je suis contente d'avoir fini cette première étape, surtout que les côtes de mailles étaient bien casse-pieds. Je vais maintenant passer à la bande en dessous. 
I'm glad to have finished this first step, especially the chainmails which were very annoying. Now, I will work on the strip below.


Là aussi, je risque de rencontrer quelques difficultés, parce que cette zone est très dégradée et a subit beaucoup de restauration. 
I may encounter some difficulties again, because this area is highly degraded and has undergone many restorations.


Pour commencer, il y a ces petites vagues, sous les pattes des chevaux, qui doivent représenter le sol. La couleur du fil est complètement passée et change tout le temps, donc difficile de savoir laquelle je vais utiliser. Je crois que je vais prendre un vert foncé, un peu arbitrairement, mais il faut bien choisir quelque chose.
Ensuite, il y a les croix, à moins que ce ne soit des fleurs de lys. Elles ont été refaites sur du rapiéçage, donc ne correspondent plus au dessin original. Je pense que je vais prendre pour modèle celle de la bande du haut, où une autre de la bande du bas, sur une partie moins endommagée, et essayer d'arranger le dessin.
Firstly, there are these small waves, under the legs of horses, which must represent the ground. The thread color is very degraded and changes often, so itis hard to know which I will use. I think I'll take a dark green, somewhat arbitrarily, but I have to choose something.

Then there are the cross, unless it be the lilium flowers. They were done on patches, so do not have the original design. I think I will used the cross of the top strip as a model, and try to arrange the drawing.


Enfin, il y a les ... heuuu ... on va dire que ce sont des chiens. Celui de gauche doit être original (voir la photo au dessus), mais celui de droite a été presque entièrement rebrodé sur une pièce rapportée. 
Finally, there's ... mmmmm ... we will say that they are dogs. The left one (see the picture above) must be original, but the right one was almost entirely re-embroidered on a patch.


Normalement, ils devraient être symétriques, puisque les animaux vont le plus souvent par couples sur la tapisserie, comme les "griffons" au dessus. 
Normally, they should be symmetrical, since animals are usually in pairs on the tapestry, as the "griffins" above.


Donc là aussi, il va falloir que je trouve une solution. Une approche pourrait être de se dire "Les restaurations font partie de l'histoire de la tapisserie, donc on les reproduit telles quelles". Mais elles sont souvent très moches, et je n'ai pas vraiment envie de broder ça. Donc je préfère prendre le parti de rechercher la forme originale, quand je le peux. Là encore, c'est un choix, arbitraire, mais assumé ;-). 
So here too, I'll have to find a solution. One approach would be to say "The restorations are part of the history of the tapestry, so they have to be reproduced as they are". But they are often very ugly, and I did not really want to embroider them. So I prefer to take the party to seek the original form, when I can. Again, it is a arbitrary but assumed choice ;-).
Vous avez là un aperçu de mon programme pour les semaines (mois ?) à venir. Je prendrai ces problèmes un par un lorsqu'ils se présenteront, et on verra bien.
So, you have a idea of my program for the next weeks (months?). I will take these problems one by one as they arise, and we will see.

samedi 21 juillet 2012

TAST 29 : le point basque

Cette semaine, le sujet du TAST de Sharon est le point Basque, c'est du moins la traduction littérale du nom anglais "Basque stitch". Je l'ai utiliser pour broder un carré. Pas parce que, ayant fait un rond la semaine dernière, je me suis dit "Tiens, cette semaine je fais un carré pour changer". Non non ! En fait, j'ai une petite idée derrière la tête. Un truc que j'ai envie d'essayer depuis pas mal de temps, mais que je n'avais pas encore eu le temps de concrétiser. 
This week, the topic of Sharon's TAST is the Basque stitch. I embroidered a square with it. Not because, having made a circle last week, I thought "Well, this week I make a square to change." No no! In fact, I have a small idea in mind. A thing I want to try for quite some time, but I had not had time to materialize.


J'ai eu quelques difficultés avec. D'une part parce, étant partie du format que je voulais obtenir, j'ai brodé mes lignes de l'extérieur vers l'intérieur. Du coup, à chaque rang, j'ai eu pas mal de soucis pour ajuster la longueur pour que ça tombe "juste". Je crois que ça aurait été beaucoup plus facile si j'avais brodé de l'intérieur vers l'extérieur.
I had some difficulties with it. Firstly because I embroidered my lines from outside to inside, begining at the contour of my square. So, for each rank, I had a lot of trouble to adjust the length . I think it would have been much easier if I had embroidered from the inside to the outside.
Les coins m'ont donné du fil à retordre aussi (c'est le cas de le dire). J'ai essayé plusieurs méthode pour prendre les virages à angles droits, mais là encore, ce n'était pas évident de faire quelque chose de propre, comme vous pouvez le voir.
Corner gave me a hard time too. I tried several methods to take corners at right angles, but again, it was not easy to make something clean, as you can see.


Pauline n'était pas à la maison cette semaine. Elle n'est rentrée qu'hier soir, mais elle a quand même eu le temps de broder quelques points aujourd'hui.
Pauline was not at home this week. She's back last evenig, but she still had time to embroider a few points today.


mercredi 18 juillet 2012

Finalement, point de chaînette

Avec l'aide de vos conseils, je suis venue à bout de la lance. Comme l'avait suggéré Claudia, le mieux était de tester les points in situ. Après quelques essais, je l'ai finalement brodée au point de chaînette d'un bout à l'autre. J'ai essayé de changer de point là où elle semblait s'affiner, mais le "décrochement" était trop marqué. J'ai donc essayé d'allonger un peu les points pour les rendre plus étroits (je ne sais pas si je suis claire là). Et ça donne à peu près le même rendu que sur la tapisserie originale (là).

With your advices, I had stitched the spear. As suggested by Claudia, it was best to test the different stitchs and see. After a few tries, I finally embroidered it in chain stitch from one end to another. I tried to change the point where it seemed to sharpen, but the difference was too visible. So I tried to stich the loops a bit longer to make them thiner. And it looks pretty much the same as ​​the original tapestry (there).


Dans la foulée, j'ai brodée une bonne partie du pelage du cheval. Il ne me reste donc plus qu'à faire ses pattes avant. Là par contre, il va falloir une bonne dose de chirurgie orthopédique pour remettre de l'ordre dans ce fouillis.
In the process, I embroidered a lot of the horse's coat. It remains to do his front legs. There by cons, we will need a good dose of orthopedic surgery to restore order in this mess.


vendredi 13 juillet 2012

TAST 28 : point de feston double

ou peut-être point de feston va-et-vient, si on utilise une traduction plus littérale du terme anglais "up-and-down buttonhole stitch", comme nous le dit Sharon sur son site PinTangle.
Voici donc, mon petit travail de la semaine :
or "up-and-down buttonhole stitch", as said by Sharon on PinTangle.
Here is my work about this stitch:


J'ai utilisé quelques variations de ce point pour faire ma fleur :
I used several variations of this stitch for the flower :


 Et voici le travail de Pauline :
And here is Pauline's work:


mardi 10 juillet 2012

Point de tige ou point fendu ?

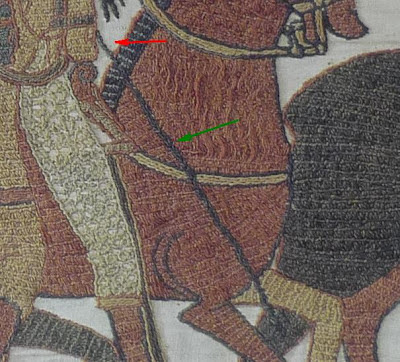
Lorsque j'ai été apprendre le point de Bayeux en normandie,   l'animatrice m'avait dit qu'on n'utilisait que du point de tige et du point de Bayeux. Mais j'ai lu récemment sur le site officiel, qu'on pouvait aussi trouver du point de chaînette et du point fendu. Du coup, ça m'a donné à réfléchir. Je pense que j'ai déjà rencontré un de ces deux points, au niveau de cette étrivière (flèche verte).
When I was learning the Bayeux stitch in Normandy, the teacher told me they only used stem stitchs and Bayeux stitchs. But I recently read on the official website, that you could also find chain stitchs and split stitchs. So, I think I've ever met one of these two points, at this stirrup (green arrow).


Mais pensant que ça ne pouvait être que du point de tige, j'en avais utilisé deux rangées côte-à-côte (flèche verte), en veillant à ce que les points soient au même niveau. Le rendu obtenu est assez proche.
But thinking it could be  stem stitch, I had used two rows of this, side by side (green arrow), ensuring that the points are at the same level. The rendering I obtained is quite close. 


Evidemment, à la lumière de ce renseignement récent, il me parait évident qu'il s'agissait en fait d'un point de chaînette ou d'un point fendu. Aujourd'hui, Je me retrouve de nouveau face à ce point, pour la hampe de la lance.
Obviously, in light of this recent information, it seems obvious to me that this was actually a chain stitch or split stitch. Today, I have to deal once again with this sort of stitch, for the shaft of the spear.


En regardant de près la photo, on voit bien qu'on a ici un de ces deux points. 
Mais deux questions se pose :
- point de chaînette ou point fendu ? Je pencherais plutôt pour le second, mais je suis intéressée par vos avis de brodeuses expérimentées.
- en regardant d'encore plus près (si si, penchez-vous un peu, vous verrez), il semble que la brodeuse ai voulu rendre le fait que la lance s'effile vers la pointe, et qu'au début, on ai un point fendu (flèche verte) mais que vers le bout, elle soit passée à un point de tige (flèche rouge). A moins que ce ne soit un point de chaînette en bas, et un point fendu en haut. A bien y réfléchir, ça pourrait bien être cette dernière possibilité. Pensez-vous que mon interprétation soit juste, et dans ce cas, OU se fait le changement ?
Looking at the photo, it is clear we have here one of these two stitchs.
But two questions arise:
- Chain stitch or split stitch ? I incline rather to the second, but I'm interested in your opinion of experienced embroiderers.
- Looking even more closely, it seems that the embroiderer wanted to make the spear thiner toward the tip. Then at the beginning, she made split stitch (green arrow) but at the end, she passed to a stem stitch (red arrow). Or perhaps it is a chain stitch at the bottom, and a split stitch up. On second thought, it could well be the latter possibility. Do you think my interpretation is correct, and in this case, WHERE is the change?

dimanche 8 juillet 2012

Broder une surface courbe au point de Bayeux

ou comment prendre une virage.
or how to turn.
Je profite de la crinière de ce cheval pour vous montrer comment faire pour "tourner" avec le point de Bayeux. Désolée pour la qualité des premières photos, c'était le soir et le lumière n'était pas terrible. En plus, le bleu foncé n'est pas la couleur idéale pour ça. Je crois que je referai ce poste lorsque je tomberai sur une autre surface courbe à broder. Mais en attendant, il va bien falloir faire avec ça ^^'
Sorry for the poor quality of the first pictures, it was evening and the light was not great. In addition, the dark blue color is not good for that purpose. I think I will remake this post when I fall on another curved surface embroidery. But meanwhile, we have to do with it.


Comme vous le voyez sur la photo suivante, il n'est pas possible de tendre un fil d'un bout à l'autre de cette portion de crinière, car la courbe est trop forte.
As you can see on the picture below, it is not possible to stretch a stitch across all the mane, because the curve is too high.


On va donc couper la zone en deux. Si la longueur avait été plus importante, ou la courbe plus forte, il aurait pu être nécessaire de la couper en trois ou en quatre. Le trait de séparation doit être perpendiculaire à la courbe, et surtout bien droit, puisqu'on va placer une barrette dessus pour le cacher.
So we have cut the area into two parts. If the length was larger, or more curved, it might have been necessary to cut it into three or four parts. The dividing line should be perpendicular to the curve, and very straight, since we will place a bar above to hide it.


On brode la première partie au point lancé. Il est normal que l'on déborde un peu dans le virage, mais ce n'est pas grave car on va replacer les fils avec les barrettes.
We fill the first part with the satin stitch. It is not a problem to slightly go out of the area, because we will replace the thread with the bars.


On ajoute ensuite ces dernières. Là, il faut faire attention de bien les placer par rapport à celle qui va cacher la séparation. Donc il faudra broder la dernière à égale distance entre la précédente et la séparation.
Then we added the bars. We must be careful to place the lasts in relation to that will hide the separation (I am sure that my sentence is ugly). So the last stitch have to be place midway between the previous one and the separation.


Il ne reste plus qu'à broder la seconde partie de la même façon, en plaçant une barrette sur la séparation pour la cacher.
And yet, we have just to embroider the second part at the same way, and to place a bar on the separation to hide it.


Cette méthode peut aussi être utilisée lorsqu'on a des surfaces trop longues, car le point lancé ne doit pas faire plus de 5 ou 6 cm de long.
This method can also be used when the surface is too long, because the satin stitch should not make more than two inches long.

vendredi 6 juillet 2012

TAST 26 : point de palestrina et TAST 27 : point de bonnet

Après deux semaines d'absence (dû à un emploi du temps surchargé, et non, je n'étais pas partie en vacances), voici donc ma contribution aux TAST de la semaine dernière et celui de cette semaine. En plus, j'ai été un peu paresseuse et j'avoue ne pas avoir fait grand chose sur les deux points.
After two weeks of absence (due to a busy schedule), here is my contribution to TAST of last week and this week's. I have to admit than I was a bit lazy and done few with this two stitchs.


Le point de la semaine 26 était le point de palestrina. J'aurai du écouter celle qui rêve et l'utiliser pour compléter mon paisley. Mais nouille que je suis, je n'avais pas compris qu'on pouvait le faire sans "tige" et je ne voyais pas comment le faire rentrer entre les deux autres rang. Et ce n'est qu'en me documentant et en expérimentant que je me suis rendue compte qu'effectivement, il aurait été parfait. En plus, j'aime bien le rendu ce cette version du point de palestrina, qui donne beaucoup de relief à la broderie. Bon, tant pis, j'essaierai le point de corail que m'a suggéré Elena, en espérant que Sharon nous le propose prochainement.
The point of the week 26 was the palestrina stitch. I made the mistake to not follow the advice of celle qui rêve and not used it to supplement my paisley. But how silly that I am, I did not realize that it can be done without "strock" and I did not see how to do it between the other two ranks. And it was only after documenting and experimenting that I realized that yes, it would have been perfect. It is a shame because I like renders this version of the palestrina stitch, which gives much relief to the embroidery. Well, never mind, I will try the coral stitch suggested by Elena, hoping that Sharon propose it  soon.


Pour la semaine 27, c'est le point de bonnet (?), traduction à la louche de "bonnet stitch" que j'ai découvert. Il m'a donné quelques difficultés, mais j'ai fini par trouvé le bon "serrage".
For the week 27, this is the bonnet stitch that I discovered. It gave me some difficulties, but I finally found the right "tightening".


Pauline a rattrapé le retard sans trop de soucis cet après-midi. Le fil qu'elle a choisi pour le second point ne convenait pas trop. C'est un peu dommage, parce qu'elle avait bien pris le coup.
Pauline has caught up without problem this afternoon but the thread that she chose for the second point does not suit well.